Auth0 Authorization Code Flow with PKCE using Expo AuthSession
TL;DR scroll right to the bottom for the complete code (and then come back up here when it doesn't make sense)
Some context
An app you say? Why yes of course! It’s what the cool kids are doing - how hard can it be?
With a recent professional React project work under my belt and far too much time on my hands (a.k.a. the winter & COVID lockdown combo) I set about building a property shortlisting app after suffering a slightly lacklustre experience with the Rightmove & Zoopla iOS apps.
A naïve start
Diving headfirst into the code is the only true path.
Browsing around the Expo API documentation looking at anything including the words ‘Auth’ or ‘Google’ I quickly got up and running with the GoogleSignIn API. A few sets of credentials generated via the Google Developer Console and eh voila! a simple log in solution:
import * as Google from "expo-google-app-auth"; const config = { iosClientId: "***.apps.googleusercontent.com", iosStandaloneAppClientId: "***.apps.googleusercontent.com", }; export const login = async (dispatch) => { const authObject = await Google.logInAsync({ config, scopes: ["profile", "email"], }); dispatch({ type: "login", payload: authObject }); };
N.B. I’m following a redux style action pattern here but you should be able to amend the code as required.
The above returned an access_token, idtoken, refreshToken & a simple user object with email address, name & avatar url - FANTASTIC!
Fail #1
Hold on a minute, change of direction.. having wanted to write my own back-end API to serve data to the app it was becoming obvious that the GoogleSignIn api is intended for use only when calling Google’s APIs. #next
Auth0 FTW
Why Auth0? Simple: their free tier is awesome. ❤️
Having drawn a line under the GoogleSignIn api I went back to the Expo docs and decided to plough on with the slightly scary looking AuthSession API. Not knowing quite where to being other than wanting the logic to ideally be in my action method (i.e. no hooks) an article online pointed me in the right direction.
A bit of time spent setting up an Application on the Auth0 dashboard and we can then plugin the Domain & ClientId details required to get the basics running.
Attempt 1:
import * as AuthSession from "expo-auth-session";
import toQueryString from "to-querystring";

const auth0Domain = "https://***.eu.auth0.com";
const auth0ClientId = "******";

export const login = async (dispatch) => {
  const redirectUrl = AuthSession.getRedirectUrl();
  let authUrl =
    `${auth0Domain}/authorize?` +
    toQueryString({
      client_id: auth0ClientId,
      response_type: "token",
      scope: "openid profile email",
      redirect_uri: redirectUrl,
    });
  console.log(`Redirect URL (add this to Auth0): ${redirectUrl}`);
  console.log(`AuthURL is:  ${authUrl}`);
  const result = await AuthSession.startAsync({
    authUrl: authUrl,
  });
  console.log(result);
}
Success! An access token from Auth0.
Securing the API
Arguably the easy bit. Having created a new C# ASP.Net Core WebAPI project using Visual Studio following Auth0 Quick Start guides allowed me to change the Startup.cs file to easily check for a token passed along with the request.
public void ConfigureServices(IServiceCollection services) { services.AddAuthentication(options => { options.DefaultAuthenticateScheme = JwtBearerDefaults.AuthenticationScheme; options.DefaultChallengeScheme = JwtBearerDefaults.AuthenticationScheme; }).AddJwtBearer(options => { options.IncludeErrorDetails = true; options.Authority = "https://***.eu.auth0.com/"; options.Audience = "https://***.azurewebsites.net"; }); } public void Configure(IApplicationBuilder app, IWebHostEnvironment env) { app.UseAuthentication(); }
Testing the API using Postman confirmed a 401 response when attempting to access the api without a token. Onwards.
Quick update to the JS to include “audience: auth0Audience” when requesting the access token from Auth0 gives a properly formed JWT capable of accessing our ASP.Net API.
import * as AuthSession from "expo-auth-session";

const auth0Domain = "https://***.eu.auth0.com";
const auth0ClientId = "******";
const auth0Audience = "https://***.azurewebsites.net";

export const login = async (dispatch) => {
  const redirectUrl = AuthSession.makeRedirectUri({ useProxy: true });
  let authUrl =
    `${auth0Domain}/authorize?` +
    toQueryString({
      client_id: auth0ClientId,
      response_type: "token",
      scope: "openid profile email crud:list",
      redirect_uri: redirectUrl,
      audience: auth0Audience,
    });
  const result = await AuthSession.startAsync({ authUrl: authUrl });
  console.log("Result", result);
}
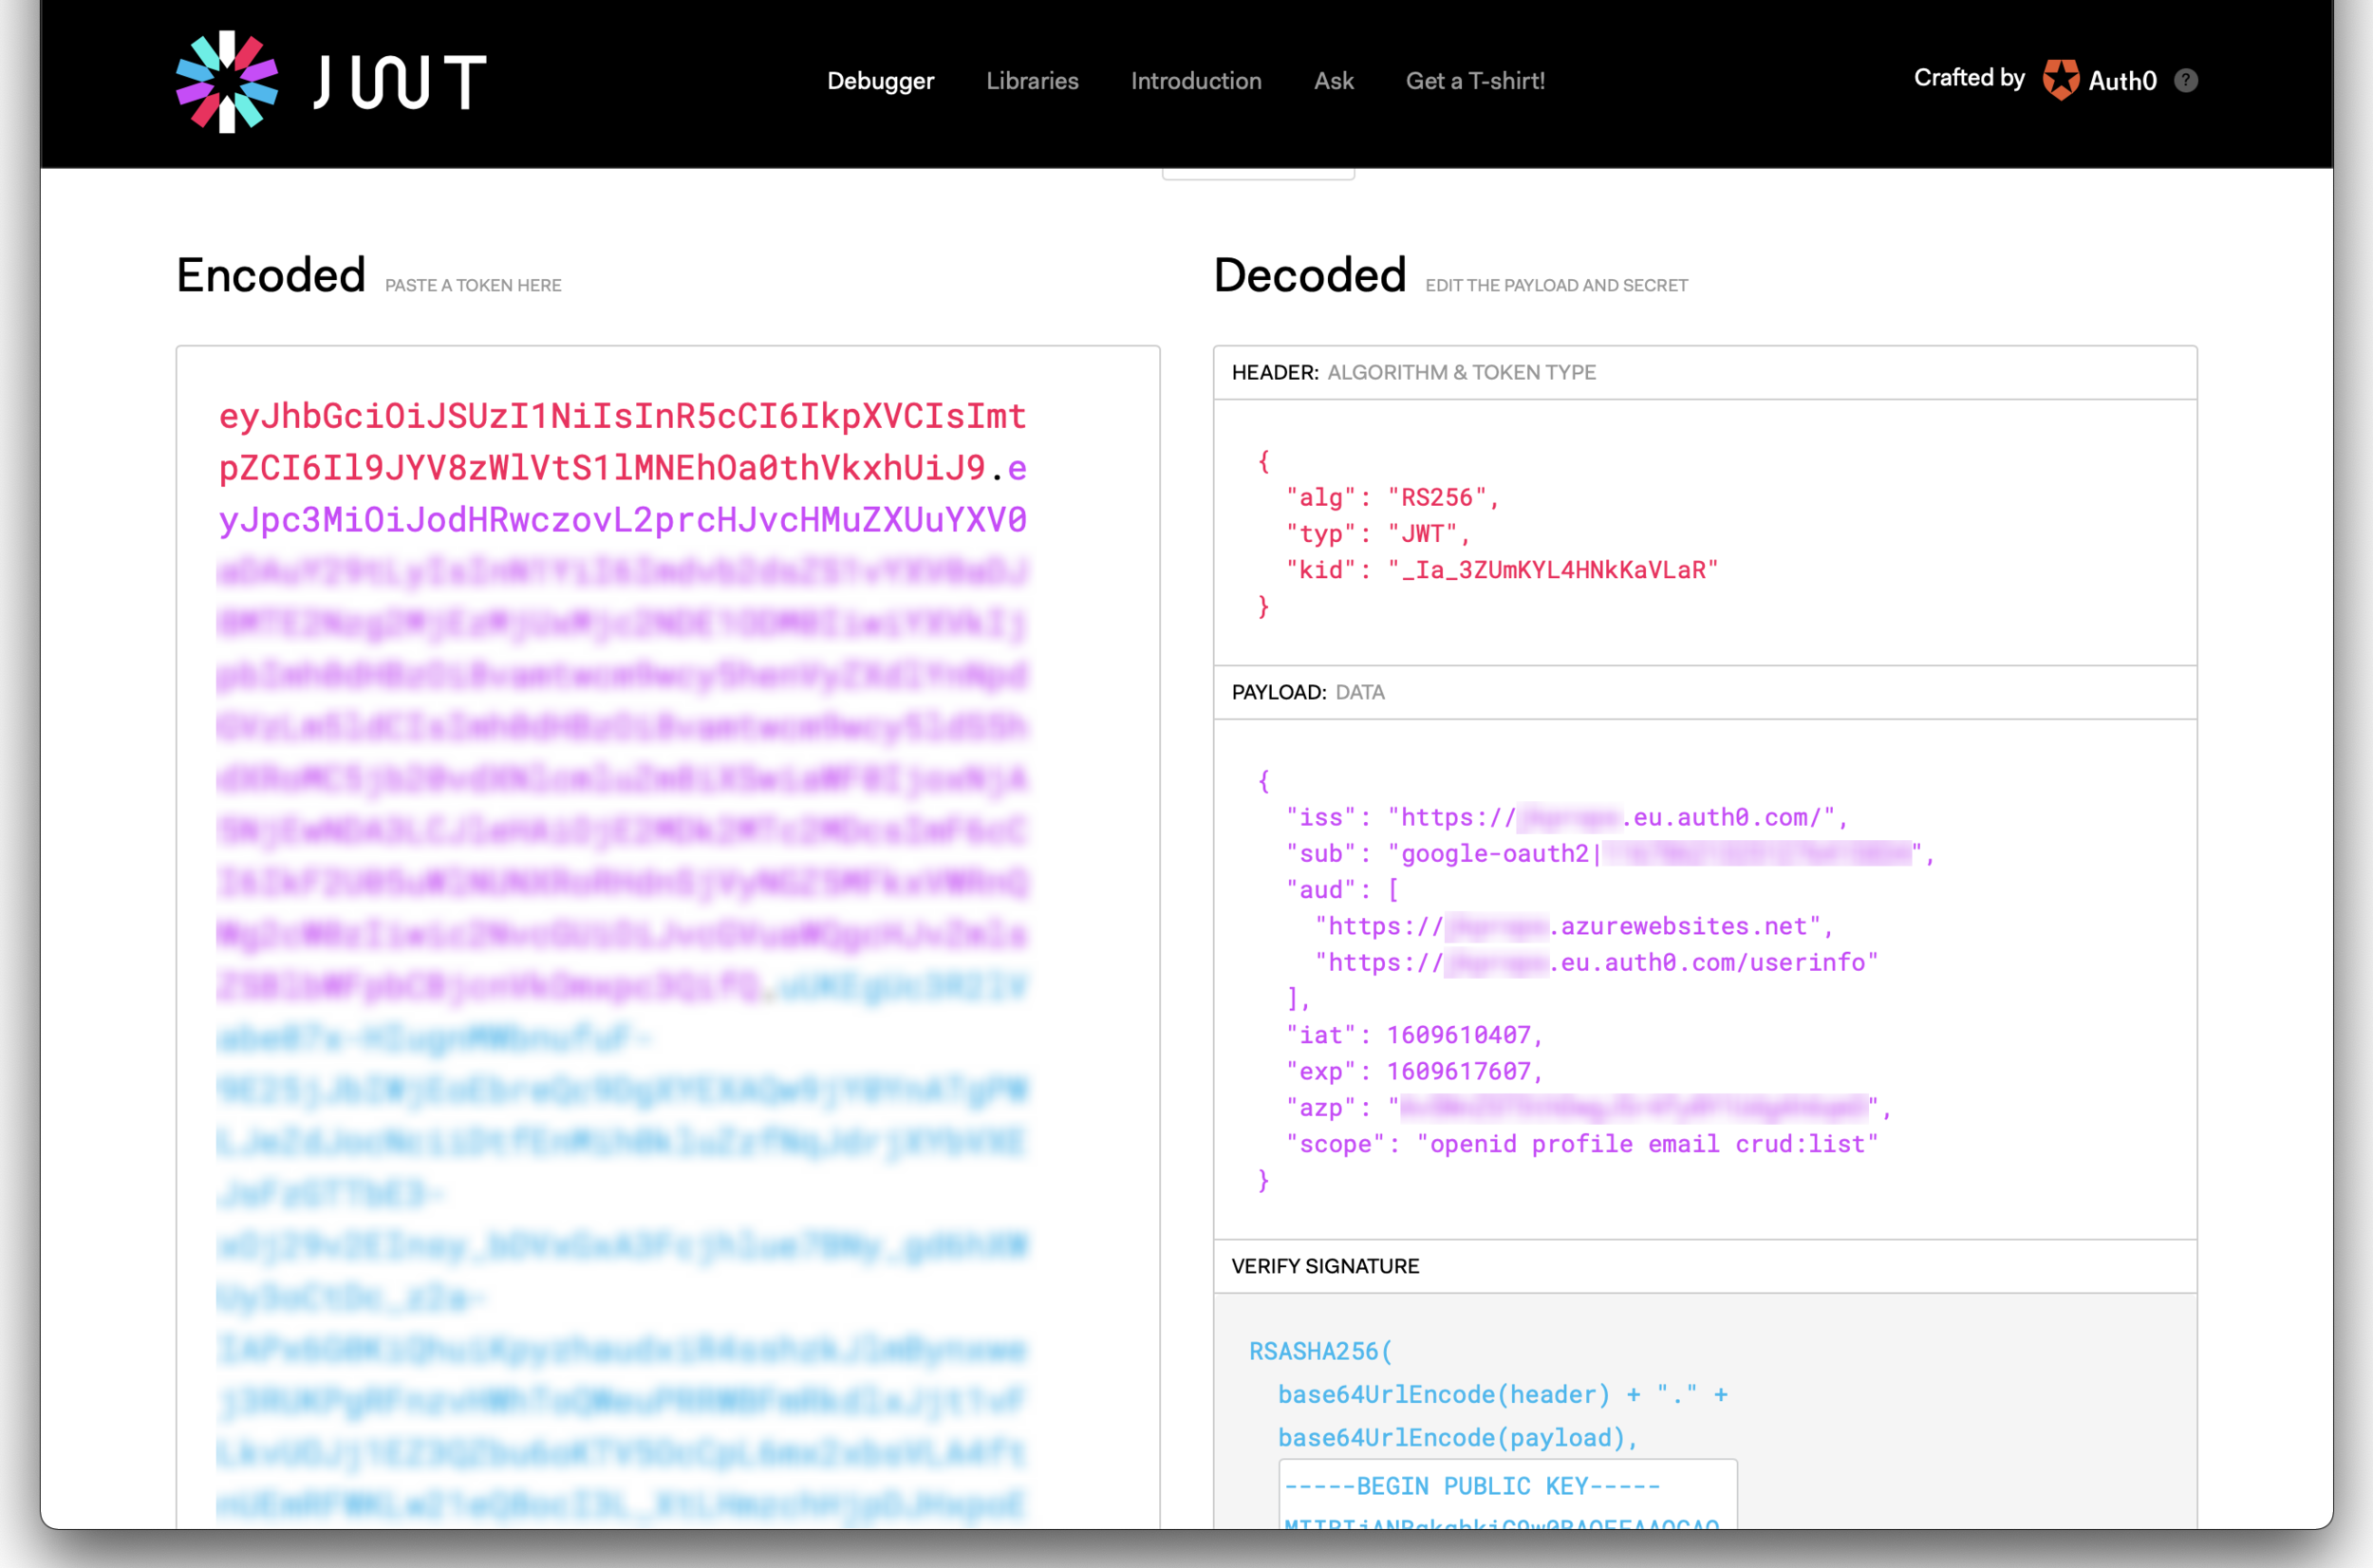
The working JWT with the correct audience for our ASP.Net WebAPI
Some obligatory plumbing; passing the token to an axios instance that we can later use to request the data from the ASP.Net WebAPI.
const instance = axios.create({
  baseURL: auth0Audience,
  headers: { Authorization: `Bearer ${result.params.access_token}` },
});
and it all works, our app can request data securely from our own custom back-end API - fandabidozi !! 🎉
Fail #2
2 hours later..
401 Unauthorized. It’s all broken! 😢
Fact: access tokens are short lived and designed to be so. (2 hours in the case of the one above.)
Solution: log out & log back in again. duh. hardly the best UX though..
Refresh tokens to the rescue
The Refresh Token grant type is used by clients to exchange a refresh token for an access token when the access token has expired. This allows clients to continue to have a valid access token without further interaction with the user.
Okay great, but in the JS code above we were only getting an access_token and not a refresh_token along with it. Seems easy enough, request the ‘offline_accesss’ scope when asking for the token says the documentation.
Not so fast. Lets talk about OAuth code flows first.
Auth code? Auth code with PKCE? Implicit? Device? Client Credentials? Hybrid?
Confused? Yeah, knowing which flow to use when is half the battle. Good news is, Implicit is dead, so that rules it out of the running. Auth0 has a handy page that recommends Auth Code with PKCE as the flow to implement for Native apps but what exactly is Expo’s AuthSession doing under the hood? On the grounds that adding the “offline_access” scope doesn’t then give a refresh token in the response would suggest something is amiss.
Sadly the response object gives us nothing to go on in terms of the inner workings of the AuthSession API.
{
  "authentication": null,
  "errorCode": null,
  "params": Object {
    "access_token": "ey...",
    "exp://192.168.1.206:19000/--/expo-auth-session": "",
    "expires_in": "7200",
    "scope": "openid profile email crud:list offline_access",
    "token_type": "Bearer",
  },
  "type": "success",
  "url": "exp://192.168.1.206:19000/--/expo-auth-session#access_token=ey...&scope=openid%20profile%20email%20crud%3Alist%20offline_access&expires_in=7200&token_type=Bearer",
}
The Auth0 documentation nicely illustrates the two-step process of Auth Code with PKCE so I began to look to do it in two steps as well hoping this would yield some insights into the AuthSession API.
Changing the JS request grant_type from “token” to “code” gives us part one of the problem - the authorization code, however we need to supply the “code_challenge” and “code_challenge_method” as per the Auth0 docs to implement PKCE. We can generate these manually in JS (with a lot of effort!) however the AuthSession API states they implement PKCE so I was keen to work out if I could borrow the logic for it.
At this dead end I began to look for alternative methods and one stood out, under Expo’s AuthRequest documentation is this line:
You can use this class directly for more info around the authorization.
A refactor of the existing code into the AuthRequest class + promptAsync() method yielded the same result but after the completion of the promptAsync() method the AuthRequest class has code_challenge and code_verifier values 🎉
The refactored code and console output: (N.B. now in TypeScript)
import * as AuthSession from "expo-auth-session";

const auth0Domain = "https://***.eu.auth0.com";
const auth0ClientId = "******";
const auth0Audience = "https://***.azurewebsites.net";

export function generateShortUUID() {
  return Math.random().toString(36).substring(2, 15);
}

export const login = async (dispatch: React.Dispatch<AuthActions>) => {
  const state = generateShortUUID();

  const discovery = await AuthSession.fetchDiscoveryAsync(auth0Domain);

  const redirectUrl = AuthSession.makeRedirectUri({ useProxy: true });

  const authRequestOptions: AuthSession.AuthRequestConfig = {
    usePKCE: true,
    responseType: AuthSession.ResponseType.Code,
    clientId: auth0ClientId,
    redirectUri: redirectUrl,
    prompt: AuthSession.Prompt.Login,
    scopes: ["openid", "profile", "email", "offline_access", "crud:list"],
    state: state,
    extraParams: {
      audience: auth0Audience,
      access_type: "offline",
    },
  };

  const authRequest = new AuthSession.AuthRequest(authRequestOptions);

  const authorizeResult = await authRequest.promptAsync(discovery, {
    useProxy: true,
  });

  console.log("Authorize result", authorizeResult);
  console.log("Auth request", authRequest);
}

*** console output ***

Auth request AuthRequest {
  "clientId": "******",
  "clientSecret": undefined,
  "codeChallenge": "JVFRdlHJEa0F4iXC3K7Lx0ROX5Pp06Hzi31hsAWzUi0",
  "codeChallengeMethod": "S256",
  "codeVerifier": "Y2f9fLA1YD8D7dl8kb5UhbvDZXmsQLXRD1sOzaKzVJo4WToBduBFQzuqGTWLXxPHnFwSTzghRgiFZv4uqrEWUygRMmA7KYkOfooLZCYKIyqk7wmspn9KvYXw67HwYdHF",
  "extraParams": Object {
    "access_type": "offline",
    "audience": "https://***.azurewebsites.net",
  },
  "prompt": "login",
  "redirectUri": "https://auth.expo.io/@***/***",
  "responseType": "code",
  "scopes": Array [
    "openid",
    "profile",
    "email",
    "offline_access",
    "crud:list",
  ],
  "state": "1k5rmgo38rq",
  "url": "https://***.eu.auth0.com/authorize?code_challenge=JVFRdlHJEa0F4iXC3K7Lx0ROX5Pp06Hzi31hsAWzUi0&audience=https%3A%2F%2F***.azurewebsites.net&access_type=offline&code_challenge_method=S256&prompt=login&redirect_uri=https%3A%2F%2Fauth.expo.io%2F%40***%2F***&client_id=***&response_type=code&state=1k5rmgo38rq&scope=openid%20profile%20email%20offline_access%20crud%3Alist",
  "usePKCE": true,
}
With the code_verifier value available we can move on to part 2 - exchanging the code for an access token.
Using AuthSessions’s static API exchangeCodeAsync() we can now provide the code_verifier value to fully implement PKCE and get both the access_token and refresh_token.
const tokenResult = await AuthSession.exchangeCodeAsync(
  {
      code: authorizeResult.params.code,
      clientId: auth0ClientId,
      redirectUri: redirectUrl,
      extraParams: {
        code_verifier: authRequest.codeVerifier || "",
      },
    },
    discovery
);

console.log("Token result", tokenResult);

Token result TokenResponse {
  "accessToken": "ey******",
  "expiresIn": 86400,
  "idToken": "ey******",
  "issuedAt": 1609619655,
  "refreshToken": "v1.*******",
  "scope": "openid profile email crud:list offline_access",
  "state": undefined,
  "tokenType": "Bearer",
}
and that’s that. 🎉
Storing the refresh_token
⚠️ Given the long expiry of refresh_tokens store them securely. If you can’t; don’t use that at all.
The Expo docs provide two storage mechanisms AsyncStorage (from React-Native) and SecureStore. We’ll be using the SecureStore API.
Straight to the code below; key point - the api will only save & retrieve strings and they must be less than 2048 characters long.
const authModel = new AuthModel();
authModel.accessToken = tokenResult.accessToken;
authModel.refreshToken = tokenResult.refreshToken;
authModel.issuedAt = tokenResult.issuedAt;
authModel.expiresIn = tokenResult.expiresIn;

// Convert the auth object to a string
const authString = JSON.stringify(authModel);
console.log("Auth string length", authString.length);

if (authString.length > 2048) {
  console.error("Auth object JSON over 2048 characters");
} else {
  // Put the auth object into storage
  await SecureStore.setItemAsync(AUTH_KEY, authString);
}
Logout
One challenge with this, Expo’s AuthSession proxy website (see their docs for more) doesn’t correctly handle logout redirects back to the app which is a little disappointing. While you can clear the application state & storage easily, clearing the Auth0 session cookies requires the browser.
export const logout = async (
  dispatch: React.Dispatch<AuthActions>,
  accessToken?: string
) => {
  if (!accessToken) return;

  const discovery = await AuthSession.fetchDiscoveryAsync(auth0Domain);

  const redirectUrl = AuthSession.makeRedirectUri({ useProxy: false });

  const revoked = await AuthSession.revokeAsync(
    { token: accessToken },
    discovery
  );
  if (!revoked) return;

  const logoutOpts = {
    client_id: auth0ClientId,
    returnTo: redirectUrl,
  };
  const logoutUrl = `$/v2/logout?` + toQueryString(logoutOpts);

  await WebBrowser.openAuthSessionAsync(
    logoutUrl,
    redirectUrl
  );

  await SecureStore.deleteItemAsync(AUTH_KEY);

  dispatch({ type: "logout" });
};
Full solution
Authorization code flow with PKCE implemented with Expo AuthSession. Typescript.
Caveat: there’s probably a better way of doing this as the below mashup of AuthRequest instance and static method usage just doesn’t feel right - please comment if I’ve missed something glaringly obvious.
If this helps you in any way with your own log in solution or have any questions leave a comment!
import axios from "axios";
import * as AuthSession from "expo-auth-session";
import * as SecureStore from "expo-secure-store";
import { AuthModel } from "../models/AuthModel";
import { generateShortUUID } from "../shared/Utils";

const AUTH_KEY = "GoogleAuthObject";

const auth0Domain = "https://***.eu.auth0.com";
const auth0ClientId = "******";
const auth0Audience = "https://***.azurewebsites.net";

export const login = async (
  dispatch: React.Dispatch<AuthActions>,
  connection?: "google-oauth2"
) => {
  try {
    dispatch({ type: "loading" });

    await SecureStore.deleteItemAsync(AUTH_KEY);

    const state = generateShortUUID();

    const discovery = await AuthSession.fetchDiscoveryAsync(auth0Domain);

    const redirectUrl = AuthSession.makeRedirectUri({ useProxy: true });

    const authRequestOptions: AuthSession.AuthRequestConfig = {
      responseType: AuthSession.ResponseType.Code,
      clientId: auth0ClientId,
      redirectUri: redirectUrl,
      prompt: AuthSession.Prompt.Login,
      scopes: ["openid", "profile", "email", "offline_access", "crud:list"],
      state: state,
      extraParams: {
        audience: auth0Audience,
        access_type: "offline",
      },
    };
    if (connection && authRequestOptions.extraParams) {
      authRequestOptions.extraParams.connection = connection;
    }
    const authRequest = new AuthSession.AuthRequest(authRequestOptions);

    // Get the authorization code
    const authorizeResult = await authRequest.promptAsync(discovery, {
      useProxy: true,
    });

    if (authorizeResult.type === "success") {
      // Exchange the code for an access token
      const tokenResult = await AuthSession.exchangeCodeAsync(
        {
          code: authorizeResult.params.code,
          clientId: auth0ClientId,
          redirectUri: redirectUrl,
          extraParams: {
            code_verifier: authRequest.codeVerifier || "",
          },
        },
        discovery
      );

      const authModel = new AuthModel();
      authModel.accessToken = tokenResult.accessToken;
      authModel.refreshToken = tokenResult.refreshToken;
      authModel.issuedAt = tokenResult.issuedAt;
      authModel.expiresIn = tokenResult.expiresIn;

      configureAxios(authModel.accessToken);

      if (tokenResult.accessToken) {
        const userInfoResponse = await axios.get(`${auth0Domain}/userinfo`, {
          headers: {
            Authorization: `Bearer ${tokenResult.accessToken}`,
          },
          timeout: 30000,
        });
        authModel.userInfo = userInfoResponse.data;
      }

      saveAuthObject(authModel);

      // Dispatch the token
      dispatch({
        type: "login",
        payload: authModel,
      });
    } else {
      dispatch({ type: "clear" });
    }
  } catch (error) {
    console.error("AuthAction.login failed", error);
    dispatch({
      type: "error",
      payload: error,
    });
  }
};

const configureAxios = (accessToken: string) => {
  const instance = axios.create({
    baseURL: auth0Audience,
    timeout: 30000,
    headers: { Authorization: `Bearer ${accessToken}` },
  });
  serviceOptions.axios = instance;
};

const saveAuthObject = async (authModel: AuthModel) => {
  const authString = JSON.stringify(authModel);
  if (authString.length > 2048) {
    console.error("Auth object JSON over 2048 characters");
  } else {
    await SecureStore.setItemAsync(AUTH_KEY, authString);
  }
};

*** ./UserInfoModel ***
export interface UserInfoModel {
  email: string;
  email_verified: boolean;
  family_name: string;
  given_name: string;
  locale: string;
  name: string;
  nickname: string;
  picture: string;
  sub: string;
  updated_at: string;
}

*** ../models/AuthModel ***
import { UserInfoModel } from "./UserInfoModel";
export class AuthModel {
  accessToken?: string;
  refreshToken?: string;
  userInfo?: UserInfoModel;
  issuedAt?: number;
  expiresIn?: number;
}

*** ../shared/Utils ***
export function generateShortUUID() {
  return Math.random().toString(36).substring(2, 15);
}